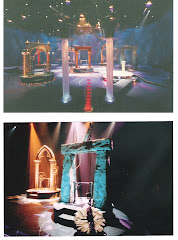
The first brick set we did was WAGA, the Fox station in Atlanta. Of course Atlanta thinks of itself as a brick city - Georgia is the red clay capital of the world. So there were brick walls, brick headers, brick columns, brick everywhere. Eddie and I knew how to do brick: go to the lumber yard in Winter Park and buy 4X8 sheets of brick paneling. It looks great with hardly any labor other than cutting chunks to fit while maintaining the integrity of the brick pattern. Other guys knew other ways: buy vacu-formed plastic sheets; make a brick-shaped stamp and dip it in paint between stampings on the wall. No. The New York designers had done a brick wall for MSNBC, shown it to WAGA, and that's what they wanted. Now, try to imagine the most labor-intensive way you can think of to make artificial bricks, and I'll bet the way we were instructed to do it outdoes your idea.
Stage one: cut up 1/2" thick homasote (pressed paper board used for insulation and sound deadening) into brick-sized chunks, which, of course, requires a consensus to be struck about what size a brick-sized chunk should be, which took the better part of a day. Stage two: devise a method by which a brick-sized chunk of homasote can be quickly and fairly consistently split into two brick-sized chunks. This also took the better part of a day. After trying saws, a machete, chisels and any number of knives, the winner was a two inch wide strip of 1/8" aluminum, sharpened on one long edge and wrapped with tape around the end for holding it in place, laid along the center of the edge of each chunk and pounded through with a twenty ounce hammer. So there was also the need for a couple of blocks to hold the brick chunk vertical while its thickness was halved. So, after several days of trial and error and pounding the aluminum blade, we had several boxes of raw material. Stage three: using a series of spacing jigs, the split bricks were contact cemented and stapled to the board, rough side out, with each edge of each wall, header, column coming out to even bricks, which took a little finagling to space correctly. Stage four: the art department took over, first sliming the whole wall, header, column, whatever with joint compound, then when that was dry, he base coated it all brick red, then spattered it all three or four more colors - black, orange, white, yellow whatever - and when that was dry, painted in the mortar lines between each brick. We all just shook our heads in wonderment as the weeks ticked by and slowly this whole process became - I admit it - very realistic rough-brick treatment. Yes, we said, it really looks better than the paneling or the plastic - but when you watch the news, is that what you are seeing? Not if the news is at all interesting. And we knew from Court TV that you almost never see any part of the set anyway.
The bottom line for us is, if someone is happy to pay us to turn a one-day project into a three-week project, we're happy to take their money.
A year or so later, I heard that we were going to do WMAR TV Baltimore. I was bred and bawn in Baltimore, so I had an inkling that the box of leftover bricks were going to finally get used. Even though this set was designed by F/X designers, they opted for the same proven method for the whole WMAR set. Proven, that is, to be the most time-consuming possible way to make fake brick walls short of slicing up real bricks.
Saturday, January 29, 2011
Monday, January 10, 2011
Inventions
One thing about working in show biz is that there are things to be done that nobody has ever encountered, st least not often enough for the special tool or hardware to be available. Thinking back to Imasge International, I'm remembering an oblong tube of brass that was just wide enough and deep enough to slide over a cup hook, with a short shaft that went into your cordless drill. Each Christmas season, the guys hung decorations all over Disney World and other places using cup hooks - hundreds of them. This invention turned cup hook installation into a seconds long project instead of a minutes long one. I didn't invent that one. I think maybe Eddie did.
In the news set business, there were several things I did that required new inventions. One design of columns included lights inside that needed to be accessed for changing tubes and whatnot by the use of "hanger bolts," threaded rods with wood screw threads on half the length and machine screw threads on the other so that it could be screwed into the wood of the column, a cover fitted over the opening with threads poking through, and wing nuts to hold the covers on. I was given this job, and seeing that there were twelve columns with ten hanger bolts each, I reasoned that my time would be well spent inventing a fast way to drive them into the wood, stopping at the proper depth. I took a turnbuckle, which had a deep threaded hole, cut off the part I didn't need, screwed a regular bolt into it, stopping at the right depth, and asked a welder to spot weld it in place. Cutting off the head of the bolt gave me a shaft for my drill. For years I used two of these installation units, one for quarter inch hanger bolts and one for five sixteenths. Just drill a pilot hole, set your hanger bolt in place, place your threaded hole on the end and pull the trigger. When the hanger seats in, reverse the drill, and move on to the next one. They worked great, if I do say so myself - and I do.
The other job, pretty much exclusively mine, was to prepare and install "decks-a-trim" (my name for it, still used today.) Decks-a-trim consisted of one and a half inch aluminum flat bar, which came in twenty foot lengths, sanded to a "brushed aluminum" finish, drilled every six inches at the position where a screw would go into the center of the top layer of plywood on a deck when the trim was wrapped around it, covering the edge of the carpet. First I invented the drilling bench, two sixteen foot long boards with legs hinged to them to bring them up to the height of the drill press. These could be installed or removed very quickly and stored against the wall. In the drilling area was a stick that located the hole to the proper plywood screwing depth, and a screw broken off six inches over from where the drill bit came down. I would drill the first hole, slide the bar over until the hole fit over the screw, drill again, slide, drill, slide etc. etc. until the entire twenty feet was drilled.
Then came the installation. The problem: a twenty foot long floppy piece of aluminum needed to be held to the proper height as it was located on the deck. Solution: two decks-a-trim support units that sat on the deck with enough weight to counterbalance the bar (I used iron stage weights) and sticking out far enough to support the bar without putting any strain on the location being screwed, at the correct height to keep everything parallel. I made a long one that stuck out about four feet beyond the edge of the deck, and a short one, about two feet beyond. For years they made trim installation - if not effortless, then at least possible for one person to accomplish.
One day I saw Keith running nuts around with his fingers along most of the length of six-foot threaded rods "Hmmm," I said to myself. I set up a six inch hole saw, wrapped a couple layers of tape around it, and put it in my drill. Putting the tape against the nut and pulling the trigger, the nut flew along those threads. I got an "extra mile" award out of that, nominated by Keith.
The thing about working in show biz - it was always interesting.
Subscribe to:
Comments (Atom)


